Showing posts with label Painting. Show all posts

Wednesday, April 10, 2024

7803. Do scrape painting

 When I saw that April's Make and Mingle at Kaukauna Library was Squeegee Painting, I had to sign up. I always thought squeegee painting looked fun and was willing to try it especially when there was no cost to me. 

Squeegee painting or scrape painting is a relatively easy concept but it is harder than it looks. You basically need a paint and something to scrap it with -- a squeegee, a knife, a library card, an old credit card. Basically anything with a flat edge. We used library cards.

We taped down our practice paper. Then we put a drop of paint on the tape. This was to be our palate. Then you scraped the paint towards the bottom of the paper. You are supposed to hold your scraper at a 45 degree angle. You can also make wavy lines. It is supposed to make really cool designs... except I forgot to hold my scrape at a 45 degree angle so it was not as cool.

You could also apply paint directly to the scraper edge to make the rainbow effect. 

You could also apply drops of painting directly to the paper in random patterns and then scrape down. This was supposed to make a really cool looking design. Mine looked like a really bad finger painting. Again I forgot about the 45 degree angle. 


Needless to say this was not my best work of art. I learned that I need to remember to pull down at a 45 degree angle. Danielle agreed this would be a good painting activity for a girls' get together. Maybe next time will be a success. 

Friday, April 5, 2024

5038. Paint something at Catch Fire Creations in Menasha

Thanks to a post on Facebook, I discovered a new artsy place I had to visit. During the month of March you could painting 3D printed Easter Eggs for a dollar each. Unfortuntately I didn't there in March but Danielle shared an adopting a bee project for April. I was game and we met up at Catch Fire Creations to paint some bees.


Catch Fire Creations is in downtown Menasha between a liquor store and brewery. It is a paint your own object place except all the objects are 3D Printed. I'm saying object because they have animals, planters, and things like wine bottle holders. They are open Tuesday-Saturday 11-7 and 10-3 on Sundays. Prices vary based on the project. Our bees were $5 and that included a vial of wildflower seeds.

The process is pretty simple. You pick out what you want to paint from the store and pay for it. Then you gather your paint and brushes. They have a wide variety of colors.. like a whole wall. Some were even glitter glue to make your creation sparkle. They also had ribbons, fabric, pom poms, etc. to decorate with your creation with. 

Once we had our paints, we got to work. It was not as easy I thought it would be to paint a small plastic object. My lines were not perfect so the colors are not perfect. It is a total Amy project.


The bee was harder than the hive. I didn't realize the "feet" looking things were actually his wings. I initially painted them yellow. Oops. Eventually I figured it out and painted them black along with some stripes. My bee definitely looks like he got into a fight.


After we were done painting, either a color or the entire thing, they had these hand held fans to dry the paint quicker which was nice. They were also heavy duty dryers in the back in if you needed them.

We probably spent about 30-45 minutes painting our bees. The bigger the object or the more detailed you want to be, probably will take you longer. 


Catch Fire Creations is a perfect rainy day activity for kids or adults. They are definitely worth checking out. I may have to paint the axolotl next time. I can't wait to see what May's project will be. It sounds like they have a monthly project every month. 


Wednesday, March 27, 2019

Painless Painting Fun

I saw that Menasha library was doing a paint night in conjunction with Rooster Dreams. It was free. Rooster Dreams does paint parties and makes it really easy to create a masterpiece with stencils, step by step instructions, and even pointers. I felt I could totally handle this kind of painting and it probably be better than my Bob Ross Painting.

When I got to the library, I was pleasantly surprised to see that we literally had to paint a pre-drawn canvas. At each station was a drawing of flowers and a palate of colors. Kristine gave us a few pointers such as what side of the canvas to make sure your paint and water were and basically told us to have fun.


It was refreshing to actually be able to paint a picture without worrying about how it's going to turn out since Kristine took out 80% of my problem... creating the image. I just had to paint. I could mix colors and blend colors to my heart's content since the image was already there. I really only had one regret on the first flower. I didn't like the colors I chose thus not really liking the way it turned out. I reminded me too much of a taco


When we were done, Kristine sent us home with instructions to outline the flowers with black Sharpie to make them pop. And pop they did.


I have to say this probably the best painting I've done since my middle school Coca-Cola can. I would do this again either at the library or at Rooster Dreams again. I can totally handle painting between the lines.

Saturday, September 22, 2018

Volcanic.. Er I mean Tree Art Fun

When Danielle asked if I wanted to go to the Trout Museum to see The Giving Tree exhibit, I was all game. I really like Shel Silverstein's books and I thought it was would be cool to see. Well it turns out Danielle read the FAN Pass wrong and we weren't looking at Shel Silverstein art but creating our own art based on his book The Giving Tree.

The Giving Tree was the theme for the Family Studio Workshop. We to create our own hand print trees to tie in with the the tree in the The Giving Tree. I was not expecting to paint or actually get messy with this activity. After I got over my initial shock of actually doing art, I was all about getting messy and dirty.


So I got busy. I painted my hand with paint. Or I had Danielle paint my hand because well the other one was covered in paint.


I made some hand print leaves overlapping in the middle of the paper. Then I painted on a trunk... My very fat tree turned into a volcano. Hey at least I was creative.


Instead of being discouraged, I grabbed another piece of paper and some more paint. This time I stuck with a skinny trunk and it looked more like a tree than a volcano.


Then I decided I wanted to do one last tree of just thumbprint leaves. So I had Gavin and Danielle help make my tree. The hubby said it looks like a Skittles tree. Can't knock a girl for trying.


To make your own volcano trees you will need

1. Paper
2. Washable Paint (Crayola works best)
3. Brown marker
4.

Draw a fat tree trunk on the paper with the brown marker. Squeeze some paint on to a paper plate and dip your hand into the paint. Press to paper. Repeat with different colors until your volcano/tree is full of leaves.

It is a similar fun art project that just about anyone can do. Who knows maybe one day my volcano tree will be worth millions of dollars.

Wednesday, August 9, 2017

Wood Painting with Sisters

Jennifer was back in Wisconsin for a visit and wanted to do something with Andrea, Heather, Amanda, and I one night. Only Andrea and I were available as Heather and Amanda were out of town. We wanted to do something creative and since Sheboygan doesn’t have a wine and paint place we opted for Board and Brush – paint your own sign place.

I’ll be honest I was not overly enthusiastic about this idea once I started looking into it. First I thought $65 was pricey to paint a price of wood regardless of size… a small sign and a large sign cost the same. Sure they have to cut out all the stencils for you but still… Most of the design options would not work in our apartment that doesn’t have a lot of open wall space.


After narrowing it down to a couple of choices, I had the hubby help me decide. We went with a sign for the kitchen.

Despite my initial hesitation about this whole wood painting thing, it turned out to be an enjoyable evening. The three of us booked a private party which was nice – we had a lot of 1 on 1 attention with our fabulous instructor, Kayla.

First we had to prep out wood. We had to sand the entire piece of wood.

After that I was the lucky one – I actually had to assemble my sign since it was 2 boards. I got to use power tools… let’s just say I will leave that to the hubby in the future. Luckily the instructor was able to assist me since apparently 1 glass of hard soda was too much for me to be able to handle the drill. Next time I’ll pick a sign that doesn’t need drilling.


Once my board was put together, it was time to stain our boards. There were a variety of stains to choose from depending on what look you wanted. Since I wanted to go with Badger colors to match my kitchen, I went with a lighter stain. You could also do a wash over the stain to give it another color or look which Jennifer did.


After we were high on fumes, it was time to apply our stencil and paint. This was not as easy as it sounds. It required 2 people to peel off the contact paper from the stencil to make sure all the little bits and pieces of the stencil came along with it – one to hold the stencil and one to peel. Then you had to stick the stencil to the wood and make sure all the bubbles were out to avoid paint running.


Finally it was time to paint the stencil. You didn’t want to use a lot of paint otherwise it would run. It was more like daubing the paint on. I was lucky that I had just words and 2 colors. Andrea had a bunch of leaves and Jennifer actually had 2 stencils. Once the paint was dry, we carefully peeled off the stencil and sealed it. Andrea got some sparkle and Jennifer did her other stencil with glitter paint.


All in all it wasn’t a bad evening. I had fun. I made a cool sign but I’m still not liking the $65 price tag. They do have some make and take events where you drop in, make a sign, and take it home for ½ price. It’s just not personalized. Maybe I’ll do a holiday one like that sometime. I like the concept and if I was crafty (and a Circut Owner), I could probably make them for a cheaper.


However, don’t let my dislike of pricey things stop you from making one. Go do it. I promise you will like it.

Sunday, October 30, 2016

A Painting Adventure

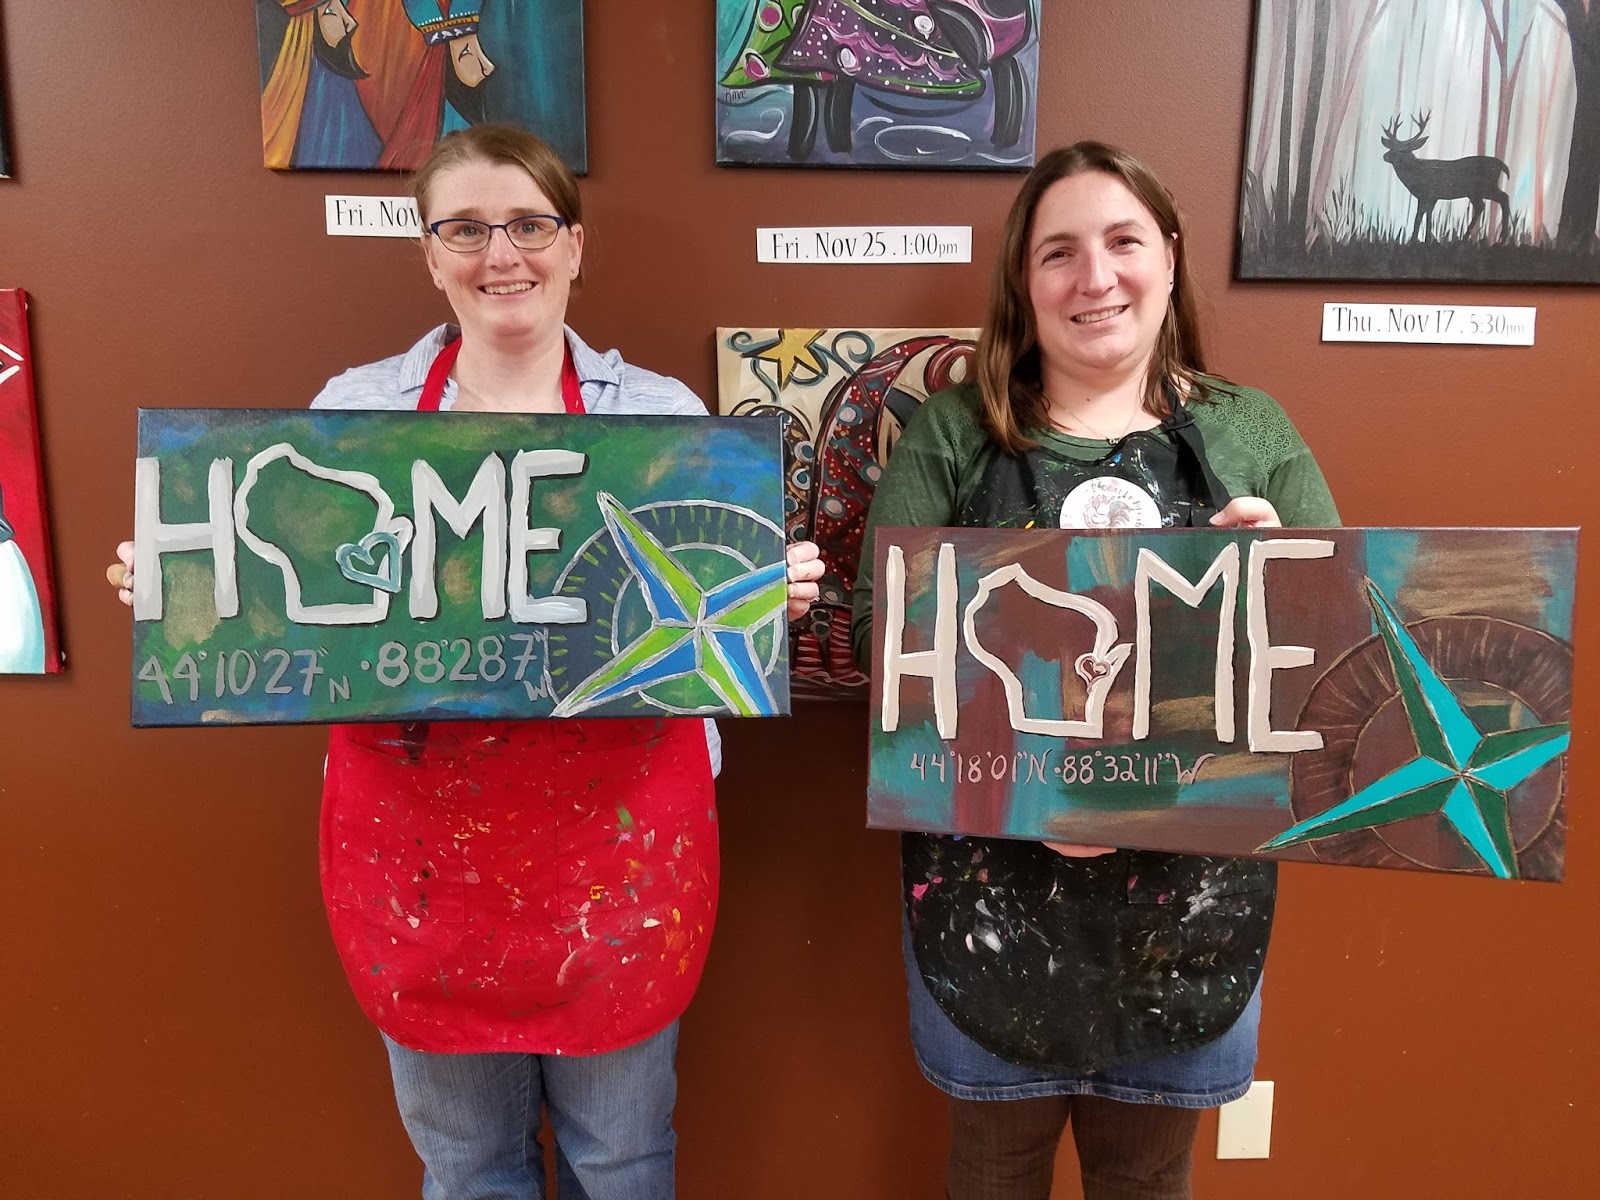
Heather has been trying to get me to do a create and consume event with her at Rooster Dreams in Neenah. We tried to find one that worked in September but it never happened. She sent me the list for October and we narrowed it down to 2 options… a pumpkin design and a home sign. Since we could use the home sign all year round, we opted to go to that one.


I was very hesitant to do one of these painting events because I am not a very good artist yet I am somewhat of a perfectionist. I was dreading taking home something that didn’t turn out to be very good. Heather assured me Kristine was very helpful and gave great directions. It really didn’t put me at ease but since I was willing to do anything once, I put my fears aside and decided to give it a whirl.

After grabbing dinner and a snack to bring with us at Q’doba, we head downtown to the Marketplace and Rooster Dreams. We get upstairs and settle in just before it was to start. I was expecting everyone to do the same painting with very little personalization but I was mistaken. We were told to pick out 4 colors we want to use as our background. I went with a lighter blue, a darker blue, a dark green, and a mustard yellow.


Kristine would show us what to do on the canvas before letting us do it which helped immensely since I need that visual. Our firs take was to make a patchwork quilt of color on our canvas. I started with the yellow and moved into the blues and greens. This was my first mistake. I should have started with one of the darker colors so when I started to blend and layer, the blue or green would not have stood out as much as the yellow did or turn to green as the yellow and blue did. Because I wasn’t happy with the bright yellow splotches mixed with the darker blues and greens, I smeared the yellow into the blues and to make more of green. Some of the yellow showed through but it gave it more of a blueish-green background that didn’t look bad.


Once we had the background painted (and dry) it was time to move onto the letters and compass. I was slightly apprehensive about having to draw the compass and the state of Wisconsin but Kristine quickly calmed my fears by passing out Wisconsin stencils and rulers and circles for the compass. It’s okay to cheat in the design of good art. I had no problems with the letters. The compass on the other hand really gave me trouble. The circles were easy the arrows were too much for my feeble mind to grasp or something. They did not line up properly. Luckily Heather and Kristine were there to rescue me and helped me realign my lines so they went to the correct points.


Painting the letters wasn’t that difficult. I had some difficulty adding dimension but they came out alright. Freehanding the latitude and longitude wasn’t horrible except I made the numbers too big and the 8s were a bit of a challenge. The compass still wasn’t being my friend though. I had a lot of trouble getting the arrows to have dimension partially because they didn’t line up exactly right. The other “issue” I had was the border of my compass was too dark in my opinion. I was told we can fix that with metallic paint and it was. The silver metallic greatly helped my compass and the gold added an extra layer to the background.


Overall I was pretty satisfied with how it turned out and the hubby wanted to know if we could frame it. I told him we could hang it up without being frame. He said it almost looked professional… I wouldn’t go THAT far.


Would I do it again? You bet. However, it just has to be when it’s in the budget as Kristine doesn’t accept cards just cash and checks. I’d love to get a group of friends together and all of us go paint. As much as I would love to do a winter scene, I’m thinking the budget says we need to wait until spring. I will be definitely be painting again. It may be one of those things that I do often enough that I run out of room to hang my paintings.